
How To Make Kickass PCBs
September 2009
I've read numerous articles on the web about etching your own printed circuit boards, and, fed up with long lead times, I spent a bit of time trying to make my own. After a few attempts, I've synthesized the various guides into a process that has given me phenomenal results on the first attempt, with tiny (less than 10 mil) traces and no broken or bridged traces. Note that this tutorial is for single-sided boards only, but it's possible to use these methods to create double-sided boards as well.
The key to success:
Use Pulsar products. They really work.Sure, it might be possible to make a PCB with magazine paper and a household iron, but it'll be frustrating and the chances are very slim that you'll get it right on the first try. If your iron isn't set just right, or you don't apply even pressure, or you don't iron long enough, or the phase of the moon isn't right, traces won't stick to the copper and will break off. It'll take lots of trial and error to get a good transfer, and for a newbie, this will cause plenty of frustration.
Also, there's a high chance that traces will be eroded away during the etching process. This might not be a problem for simple boards with thick traces, but for complex designs, etchant can eat right through tiny traces.
If electronics is your hobby, chances are, you've got some money to burn. I don't have that much money to burn, but I'm a big believer in the time-money tradeoff. Pulsar's products are definitely worth the money, and they'll save you time, frustration, and consumables. (Disclaimer: No, I'm not a Pulsar shill, just a satisfied customer.)
What You Need
- PCB layout software.
- Lots of hobbyists use EAGLE, but, despite its awful interface, I've had good results with the open-source program pcb, available for Linux and Mac OS X.
- .032", 1/2 oz., single-sided copper clad board.
- Available from Pulsar's online store. 1 oz. copper boards are more widely available, but 1/2 oz. boards cut much easier and etch quicker.
- Laser printer or copier
- If you don't have access to one, try Craigslist. Many old laser printers still work fine with modern operating systems. I bought an HP LaserJet 4 on Craigslist for $30 and it works perfectly with Ubuntu and Mac OS X over Ethernet. Note that, apparently, the toner in Brother printers does not properly release from Pulsar's transfer paper.
- Pulsar Toner Transfer Paper
- Special coated paper that easily releases toner when soaked in water. Other people have used glossy photo paper or magazine paper, but Pulsar paper gives consistent, excellent results. Toner Transfer Paper is also available at HSC Electronic Supply if you're in the Bay Area.
- Pulsar GreenTRF foil
- Essential when working with fine traces. Toner is porous; this foil is used to seal the toner so that etchant doesn't seep into microscopic holes, causing pitting and broken traces.
- GBC Personal Laminator
- Pulsar calls this the Toner Image Applicator; it's a small laminator that applies just the right amount of heat for just the right amount of time to produce a perfect transfer. Don't bother fooling around with an iron!
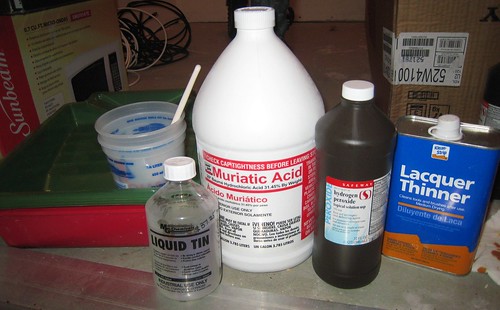
- Muriatic acid
- Don't etch with ferric chloride! It's expensive, corrodes everything, and stains everything. Muriatic acid is cheap and available at hardware stores like Lowe's or Home Depot. This is dangerous stuff, be extremely careful!
- Hydrogen peroxide
- Available from any drugstore. 3% concentration works fine. Buy a few big bottles.
- Lacquer thinner
- Used for cleaning toner off the copper board, available at any hardware store. Works better than plain acetone. Don't breathe the vapors!
- Scotch-Brite pads
- Used for cleaning the copper boards before toner transfer.
- Paint trays and measuring cups
- You don't want to work in your kitchen sink! I found it was easy to buy a couple of plastic paint trays (a couple dollars each), and disposable paint tray liners (less than a dollar each) make cleanup easy. Measuring cups are handy, just don't use anything made of polystyrene.
- Liquid Tin
- Optional but recommended. Prevents the copper traces from oxidizing and makes them easier to solder to. Available in the Bay Area at Anchor Electronics, but expensive!
- Dremel rotary tool and drill press stand
- If you don't have a drill press, the cheapest option is to use a Craftsman/Dremel tool and a Craftsman drill press stand from Sears. Apparently, the current version of the Dremel-branded stand is cheaply made, but the Craftsman-branded stand is sturdier. C-clamps are also useful for securing the base of the drill press to your workbench.
- Tungsten carbide PCB drill bits
- Resharpened bits can be found on eBay or various websites. HSC Electronic Supply in the Bay Area sells them. Try to get an assortment of sizes, you'll probably break a few bits since they're so brittle. #73 bits (0.024 in/0.610 mm) work well for integrated circuit holes. #67 bits (0.032 in/ 0.813 mm) work well for larger leads and pins. See Wikipedia's list of drill bit sizes.
- Bucket for disposal
- Don't pour acid down the drain! You should pour used acid into a container and dispose of it according to law. Your city most likely has a household hazardous waste disposal program. Silicon Valley residents should visit hhw.org.
- Latex gloves, eye and respiratory protection
- The chemicals used are toxic and corrosive. Be sure to use proper protection (goggles, face mask, and gloves), and, if possible, work outdoors.
The Process
- Step 1:
Cut a hole in the boxDesign the board - Step 2: Print the board
- Step 3: Transfer the image to the copper
- Step 4: Etch the board
- Step 5: Drill the board
- Step 6: Profit!
Step 1: Design the Board
There are plenty of resources available online for learning how to design a PCB, so I won't give a complete tutorial here. I learned mostly from examples, by looking at lots of boards and other people's layouts. Here are some basic tips I think you should keep in mind:
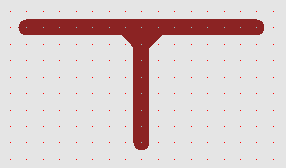
- Don't use angles that are not multiples of 45 degrees.
- Ensure there are no right or acute angles. It's easy for etchant and corrosion
to eat into sharp corners. If you have to make a T joint, round out the right angles like this:
- Try to position the centers of through-hole components on 100-mil points to keep things simple.
- When laying out traces, start with a 25 mil grid, then drop down to 10 or 5 mil if necessary.
- 15 or 20 mil traces are good for sparse layouts. Traces that carry higher current (e.g. power and ground lines) should be larger. 10 mil traces can be used for tight areas. 8 or 6 mil traces will probably work, but less than 10 is pushing it.
- Keep a minimum of 10 mil between traces. Use the design rule checker often. Use more space between a thin trace and a thicker trace, to be safe.
- Pads for through hole parts should be at least 65 mils. With larger pads, soldering will be easier, but you lose space between IC pins. Hole sizes should correspond to the drill bits you intend to use.
- If using a ground plane or copper pour, make sure to check for sharp edges or other tight areas that might potentially fuse together during transfer, etching, or soldering.
- If making a single-sided board, use other layers for jumper wires. Use vias for jumper holes, and label them in copper if you like.
- Use the design rule checker! Often!
- Check everything before printing, then check everything again. It'll be difficult to fix mistakes on a finished board.
Step 2: Print the Board
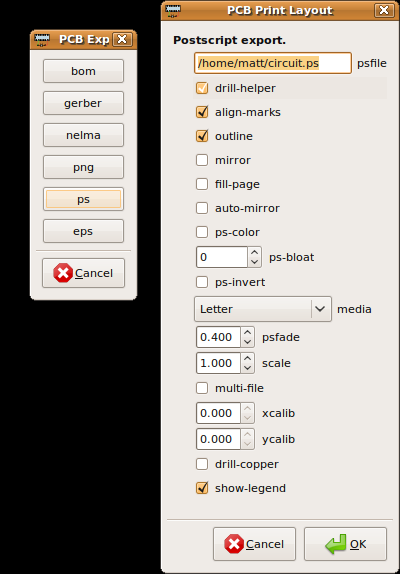
If using pcb, you should export your layout to PostScript. Turning on the drill helper will put small dots in the center of your pads, making drilling easier.
Since this design is for a single-sided board, DO NOT PRINT A MIRROR IMAGE. Imagine that your board will be placed on the printed design, copper-side down. The printed image should, therefore, be an "x-ray view" of what the underside would look like when viewed from the component side. If you have text in your layout, it should be oriented correctly on the printout.
Printing from pcb is best accomplished by exporting to PostScript, then printing from your PDF viewer. Since you have only one layer, you just want to print page 2. Turning on drill-helper and turning off drill-copper puts a tiny dot in the center of each pad, which you can use as a reference when drilling.
It's best to use the manual feed tray of your printer. First, do a test with plain paper. To determine what side of the paper gets printed on, take a piece of plain paper, draw an X on it with a pencil, and put it in the manual feed tray with the X facing up. Print your layout. If it prints over the X, you'll want to put the transfer paper in the tray with the light blue side up. If if prints on the other side, you'll want to put the transfer paper in with the light blue side down. The image must be printed on the shiny, light blue side of the transfer paper.
Take the plain paper image and make sure it was printed at the correct scale. Put some components on it to make sure they line up. Inspect it, and make sure the resolution is high enough.
Set your printer to its highest density setting and print onto the transfer paper. The image should be on the light blue side of the paper.
To save transfer paper, you could tile multiple copies of the layout onto one piece of transfer paper. Once it's been printed, cut out the design.
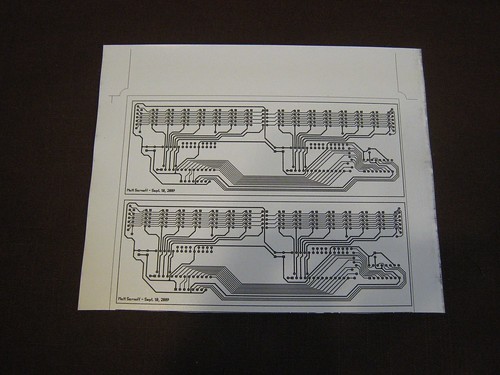
The design printed on the transfer paper. I fit three on a sheet, and used one.
Step 3: Transfer the image
Be sure to read Pulsar's instructions fully, since they cover this topic in more detail than I will.
Turn on the laminator and let it heat up for about 30 minutes. (Yes, you should have done this first to save time, and I hope you're reading this in full first, not reading as you go!) It's always a good idea to not leave it unattended.
Take your copper-clad board and cut it down to size. 1/2 oz. boards are thin enough to cut with a paper cutter, tin snips, or strong kitchen shears. (1 oz. boards will probably break your average paper cutter. I found that out the hard way.) Try not to touch the copper with your fingers, and handle it by the edges only. The copper boards should be the same size or slightly larger than the piece of transfer paper you just cut out. After you cut the board, sand or file down the edges if they're too sharp.
Clean any oxidation off the board by scrubbing it with a Scotch-Brite pad, so the entire surface is shiny.
Fill one of the trays with half an inch or so of cold water and have it ready.
After 30 minutes, when the Ready light is on, lay the printed transfer paper over the copper board (copper side up, toner side down) and put the board and paper into the laminator, with the shorter edge parallel to the slot. You can let go as soon as the laminator grabs it. When the board comes out the other end, turn it around 180 degrees (so the other edge goes in first, copper side still up). To ensure a good transfer, repeat this once more for each direction. The board should run through the laminator four times.
After the fourth time, immediately slip the board into the tray of water. Wait a couple minutes, and you'll see the edges of the paper coming off. Give it a tug and the blue paper will come off entirely, leaving the toner fused to the board. If there are any bits of toner stuck to the paper, or floating in the water, clean the toner off the board with lacquer thinner, let it dry, and try again.
Take the board out of the water and pat it dry. The toner should be fully fixed to the copper.
For boards with lots of thin traces, it's a very good idea to use GreenTRF foil to seal the toner image. Toner is porous, so tiny amounts of etchant can seep through and under it. This often leads to broken or completely obliterated traces. GreenTRF prevents this from happening, allowing very fine traces (10 mils and under) without erosion.

Without GreenTRF, etching causes severe pitting of the traces.
Cut a piece of GreenTRF about 2 inches longer than the long side of the board. The foil likes to curl up, it's kind of tricky to work with. Then follow Pulsar's instructions:
"Lay the foil, dull-side down over the board with 1" flipped around the leading edge of the board, (the edge to be inserted into the laminator). Insert in one smooth motion until the rollers grab the board. Immediately drop your fingers down over the foil to cause high drag over the foil to prevent wrinkles from forming over the toner image. After the board exits insert a second time in the same direction but this time do not touch the film. Upon exit, peel the foil 180 degrees back over itself and discard."The traces on the copper should now look shiny and slightly green. We're ready to etch!
Step 4: Etch the Board
Now... this is the part where we play with the fun chemicals. Wear goggles and use a face mask, you do not want to breathe any of this in. Wear latex gloves and try to work outside if possible so the vapors are not trapped in a confined space.
Get one of the paint trays and put a plastic liner in it. The secret recipe for the etching solution is 2 parts hydrogen peroxide and 1 part muriatic acid. You may want to do a test with water to determine how much you'll need. For my last board, which was 7 inches by 2 inches, I used 12 oz. of peroxide and 6 oz. of muriatic acid. A glass or polyethylene measuring cup comes in handy here.
Pour the peroxide into the tray FIRST.
Pour the acid into the tray SECOND, SLOWLY.
The idea behind the idea of "add acid to water" is that, since you're controlling the flow of the acid, you can pull it away easily if a violent reaction occurs. No violent reactions should happen here; just a little bubbling if anything.
Fill a second tray with water and keep it handy.
Take your board and slip it into the tray. You better be wearing gloves! Rock the tray around gently or use a sponge or brush to wipe the solution over the board. (I tried this with a foam brush and the acid ate it, so your mileage may vary.) You should see the copper dissolving fairly quickly, from the edges inward. Watch the etching process, picking the board up and checking it if necessary. The 1/2 oz. copper boards sold by Pulsar are transparent and colorless, so it can sometimes be difficult to tell.
As soon as you see all the copper is gone, leave the board in the etchant for about 15 seconds more, then place it into the tray of water to stop the reaction. Make sure the board is fully rinsed, and dry it.
When finished, do not pour the acid down the drain! Store it in a sealed container and dispose of it properly. Your city or county should have information on the disposal of household hazardous waste.
Use lacquer thinner and a paper towel to wipe the toner off the board. (You should definitely keep your mask on, unless you like feeling lightheaded). When you've got it all, give the board a good rinse, dry it, and set it aside.
If you've got Liquid Tin, use it. It will prevent the traces from oxidizing, and make soldering onto the pads easier. Pour as little as possible (it's expensive!) into one of trays. (Any container made of polypropylene or polyethylene is suitable. Look for the initials "PP" or "PE" on the bottom of the container.) Use just enough to cover the board, and place the board in the tray.
You should see the traces on the board turn from copper to silver very quickly. Leave the board in the Liquid Tin for 3 to 5 minutes, then wash it off with warm water and dry it.
I'm not sure if Liquid Tin can be reused. Since it's a strong acid, dispose of it properly, and do not pour it down the drain.
Step 5: Drill the Board
Drilling is probably the most tedious part, especially if you've got lots of holes. Though it might feel like forever, you can drill a couple hundred holes in less than an hour. The least expensive drilling option is to use a Dremel/Craftsman rotary tool and a Craftsman drill press base. From what I've read, the Dremel-branded drill press attachment is constructed very poorly. I have had no issues with the Craftsman version.
You should wear goggles and secure the base of the drill press to your work surface with clamps if possible. The drill bit is very thin and rotates at very high speed, so it is important to minimize any movement in the axes parallel to the ground. If the drill bit impacts the board at an angle, it will break very easily. PCB drill bits are very brittle.
As mentioned earlier, I use a #73 drill bit for most holes, and a #67 bit for larger holes. The bits I use are color-coded and have the size written on a colored rim around the shank. Larger have the size written in millimeters. (example: 1.15) Wikipedia has a table of drill bit sizes that you should use to pick suitable bits.
Drilling is straightforward: hold the board perfectly still with one hand and plunge the bit down smoothly into the board. Let the bit do the work. If you pull down too quickly you'll break the bit on impact. Practice a few times if necessary.
Your holes are not going to be perfectly lined up, but as long as the hole is touching the pad, a solder joint can be made. Leads are bendable, so being off by a little won't make a huge difference. This Instructable offers a really novel way of drilling precisely lined-up holes, but I haven't tried it.
Step 6: Profit!
You're done! Solder your board, and show it off to your friends! (who are probably waiting for their boards to come back from the fab house) For one-off boards, it's much cheaper (in the long run) and faster to make them yourself. A board can be made in an afternoon, using a couple dollars of consumables. The up-front cost is larger, but it's still only the price of a couple of profesionally-fabbed jobs. So, now that you know how to make PCBs that don't suck, get to work!
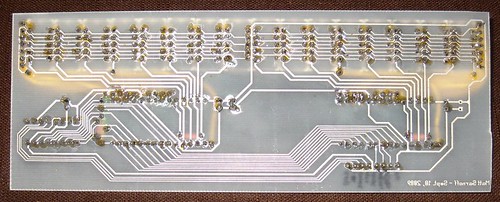
These 10 mil traces transferred and etched perfectly. (Don't mind the excess flux.)
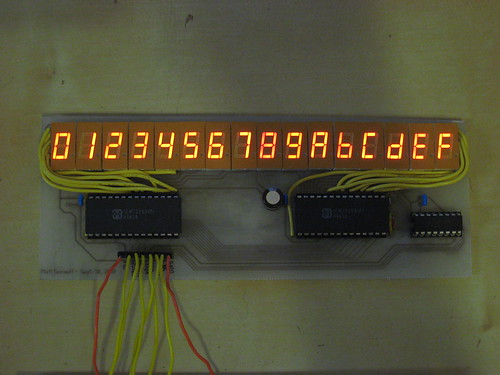
Here's the finished, populated board. It's a 16-digit LED display driven by two ICM7228 chips I found. Quite a few jumper wires were needed, since this was only a single-sided board.