
Terminalscope Serial Console
February 2010
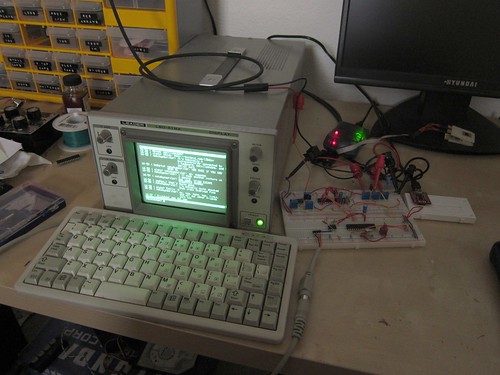
Jan might have created a cool scope terminal, but I've done him one better. ;-) The Terminalscope is a full, bidirectional serial terminal that uses a PS/2 keyboard for input and displays 54x24-character output on an oscilloscope or XY display. It can be connected to a PC via USB-to-TTL adapter or directly to another microcontroller.
Features include:
- 7-bit ASCII character set plus box-drawing characters
- Flicker-free 60Hz picture
- Most ANSI/VT100 escape sequences interpreted
- Reverse video attribute supported
- All your favorite ncurses terminal programs (vi, nano, top, links, mc, irssi, etc.) display fine
- Graphical configuration menu
- Selectable baud rate (2400-38400), data bits, parity, and stop bits
- Two configuration profiles (stored in EEPROM) quickly selectable with an external switch


More photos on flickr.
hardware
A great thing about the Terminalscope is its simplicity. Other scope projects require an expensive DAC or an inaccurate R-2R ladder. Rather than draw each character with individual strokes, op-amps are used to generate a raster scan across the screen (like a TV) and the Z axis (beam intensity) is modulated directly by the microcontroller.
Two op-amps are used as integrators to generate the X and Y linear ramps. A high slew rate, single-supply chip like the MC34074 works. (A TL3474 might work as well.) Since the op-amps are single-supply, a 2.4V zener diode is used to create a virtual ground. To generate the positive-going sweep for the X axis, a constant voltage slighly below virtual ground is fed into the X integrator. (Remember, the output of an integrator is inverted.) To generate the negative-going sweep for the Y axis, a constant voltage slightly above virtual ground is fed into the Y integrator. The two trimpots controlling these voltages can be adjusted to change the size of the image or even flip it. Due to the virtual ground, the output of the integrators has a significant dc offset. To compensate for this, large ac-coupling capacitors are placed inline with the X and Y outputs.
The video generation and serial communication is handled by an ATmega328P. (1296 bytes of RAM are required for a 54x24 character matrix, but if you'd like a lower-resolution display, an ATmega168 would work just fine.) The microcontroller sends horizontal and vertical "sync" pulses to a 4066 quad bilateral switch; closing a switch discharges the respective integrating capacitor, resetting the sweep. Since the timing of the video generation is critical, the ATmega328P can't read asynchronous events from the keyboard without mangling the picture. So an ATtiny45 is used to read the PS/2 keyboard lines. It converts scancodes to ASCII values (and non-ASCII keypresses to special values) and stores them in a queue. After the 'mega is done outputting a frame, it pulls the typed characters out of the 'tiny's buffer over SPI.
software
The time-critical display routine is written in assembly language. The ATmega328P outputs one pixel every 5 clock cycles. It runs at 20MHz, thus the pixel frequency is 4MHz. Thus, your scope or monitor must have at least 4MHz of Z-axis bandwidth.
The rest of the code, including a fairly complete video library, is written in C. It emulates "most of" a VT100; that is, enough escape sequences are implemented so that Unix console applications display correctly. I've made the code available at the bottom of the page, and it might be useful for anyone looking to implement their own terminal. Escape sequence handling are pretty much a nightmare.
connecting to a linux box
With a USB-to-TTL serial adapter (I use the one made by SparkFun), the Terminalscope can be connected to a computer. In Linux, you can talk to it using screen, like this:
screen /dev/ttyUSB0 38400(assuming the adapter is at /dev/ttyUSB0 and the Terminalscope is set at 38400 baud, 8 data bits, no parity, 1 stop bit.) If you want to give Terminalscope a login process, so you can shell into your machine from it, you'll have some configuration files to tweak. In Ubuntu (Karmic and newer), paste the following into
/etc/init/ttyUSB0.conf:
start on stopped rc RUNLEVEL=[2345]
stop on runlevel [!2345]

respawn
exec /sbin/getty -L 38400 ttyUSB0 vt100
You can now start the login process with the command
sudo start ttyUSB0.
One last thing. When you log in, Linux will think the terminal is 80 columns wide (it's really 54) and will assume it supports UTF-8 (which it doesn't). To fix this, you should add the following to your .bash_profile (assuming you use bash):
if [ "$TTY" == '/dev/ttyUSB0' ]; then
    stty cols 54
    stty rows 24
    export ROWS=24
    export LINES=24
    export COLUMNS=54
    export LANG=POSIX
fi
making your own
Be warned if you're going to make your own: your mileage may vary. A big XY monitor will probably work better than an oscilloscope. I haven't been able to get a clean picture on my Tektronix 464, but there may be something wrong with its Z axis. Some things to note:
- Due to the large ac coupling capacitors, the image will take a few seconds to position itself on the screen. It's probably possible to eliminate the dc offset with more op-amps, but this seems to be simple and good enough. I considered a dual-supply design using an ICL7660 to get -5V, but it generates ripple on the negative rail that's quite noticeable at these low voltages.
- You might have to add RC networks to eliminate noise on the lines. I put a trimpot in series with each signal lead to eliminate ringing artifacts. (This has something to do with transmission lines, but honestly I don't know much about that stuff. It was mainly trial and error.)
- If your display has a positive-blanking Z axis input, and the picture is inverted, (dark characters on light background) you can use the configuration menu to reverse the image.
- The receiving of characters from the USART is still interrupt-driven, so the display will probably jump a bit when a character is received. I think it's "good enough" the way it is, but you're welcome to modify the software to poll the USART.
code
The code is on GitHub and is released
under the msarnoff.org license. Includes
a Makefile for avr-gcc. The firmware for the ATtiny45 keyboard buffer is in the
keybuffer/ folder, and the display font (as well as a Ruby script to
create your own font from an ASCII .pgm image) is in the fonts/ folder.
Feel free to use parts of it in other projects; I've written a fairly complete escape sequence parser that might be useful for other terminal projects. The code is released under the "do whatever you want with it, but if you make something cool, let me know and give me credit" license.
links/resources
- Behavior of control characters and escape sequences from the VT100 manual
- console_codes(4) man page, describes codes used by the Linux console
- David Cranor ported some of the Terminalscope code to STM32 and made a terminal with composite-video out.
photos
Photo gallery is on Flickr.schematic
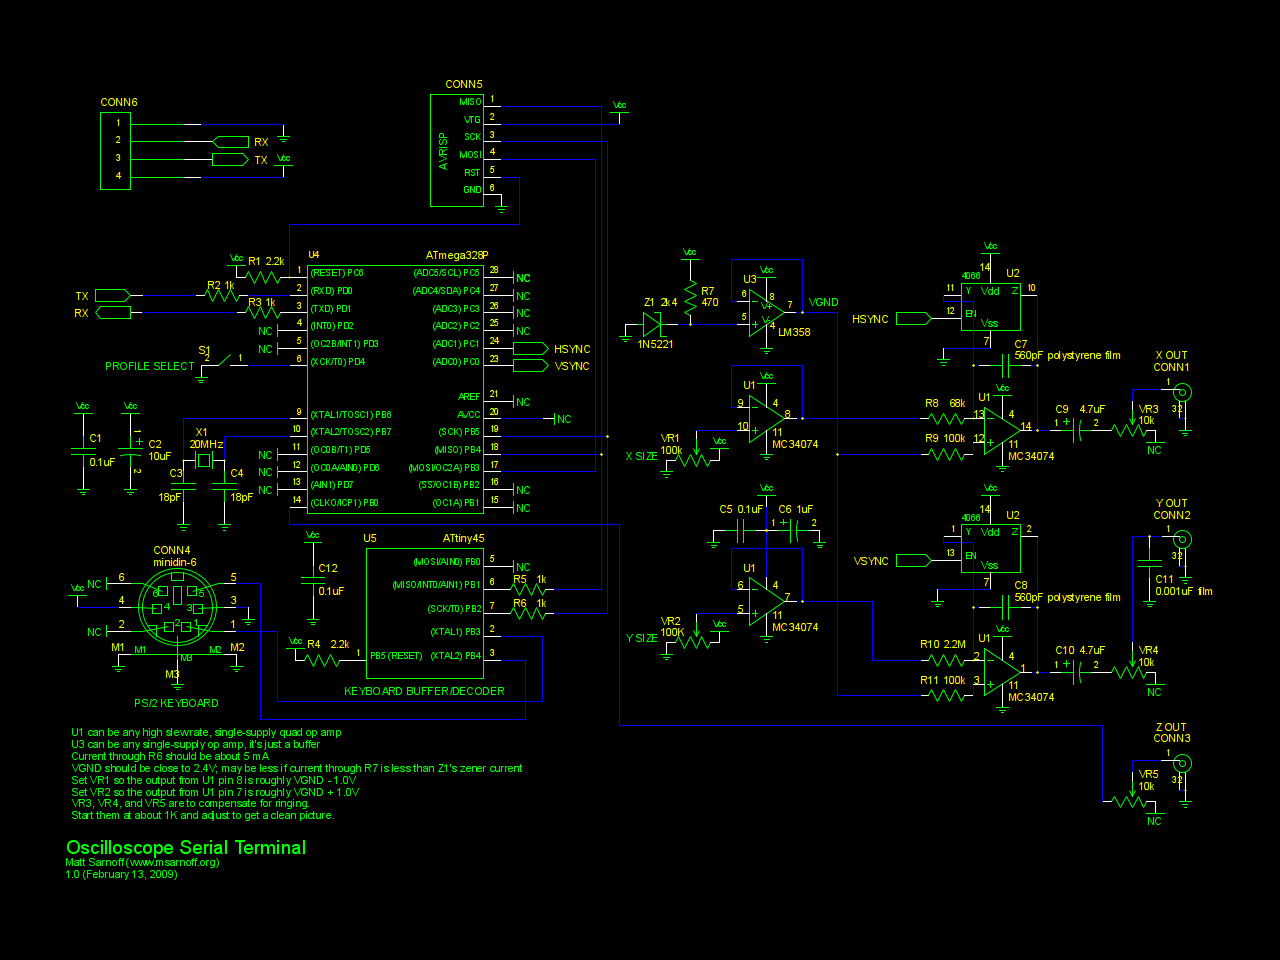
(click to enlarge)
Download gEDA schematic: scoperaster.sch
May require custom symbols from my symbols directory.
pcb

The Terminalscope is now officially off a breadboard and on a PCB. It's a dual layer board, but the top layer is entirely a ground plane. The circuit would probably fit fine on a single-sided board. Here are some things I've noticed:
- The three 10k trimpots are actually not needed at all on the PCB. They are just set to 0 ohms. I'd guess it's because the BNC connectors provide the necessary impedance, and the parasitic capacitance present on the breadboard is no longer there.
- It actually works with my Tektronix oscilloscope. The image is very faint, though. An XY monitor is still your best bet.
- The X and Y sizes are derived directly from ground and the supply voltage. This means that any fluctuations in the supply will cause the image to bounce. It's not really an issue with a regulated power supply.
- I haven't tried powering it over USB yet, though current draw doesn't seem like it would be a problem. (As long as you don't connect a beast of a keyboard like a Model M!)
- The power and signal connector is just a 4-pin header. For ease of connection to a PC, I should have used the 6-pin FTDI connector (for easy connection to a SparkFun FTDI Basic Breakout, which I don't have.)
Aside from that, it's not too bad for a first prototype. If you want to make your own, download the following: